Fallon and I decided that an ABC wall would be really fun (and easy!) to make at the party--she really wanted one. But buying the letters (average price: $3-6/letter) and then all the decorating stuff was going to be really pricy and way out of my budget. And collecting all the letters would take too long.
I decided to make them. Ok. I decided that I would design and set it all up and then have my awesome brother-in-law, Nick, make them from me. (Don't worry, he was willing. :) )
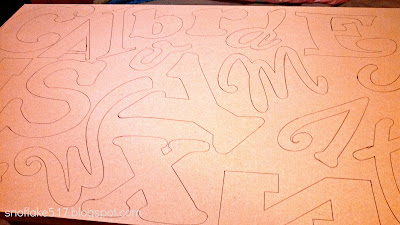
I used my Cameo to figure out sizing and fonts and then I cut out templates for each letter.
Home Depot had a sheet of MDF that was perfectly sized and priced.
I laid the letters all out on the MDF and arranged them so they all fit, leaving room around each one.
Then Nick cut them out with a jigsaw. :) I was willing to do it, but he was faster and better and so I let him.
Once they were all cut out, I sanded the edges and then primed them with a white spray primer so they were pretty. Easy Peasy.
I realized that after they were dry the primer was really thick and needed several sandings. I wasn't really happy with it. Next time (yeah, right) I'll use just regular Rustoleum white spray paint + primer (easier and cheaper) or just paint them white with regular acrylic paint--which is what I ended up doing for all the edges since it didn't really cover them well.
I was going to use a staple gun to put staples in the back to use as hanging brackets, except Caitlin forgot it in all the hustle to get out the door the morning of the party. Fallon decided that she was going to use the 3M hanging things for picture frames that don't put holes in the wall. Brilliant. Better than the staple idea.
The custom letters cost me a grand total of $18 (MDF & primer), plus decorating supplies (most which I already had on hand). That sure beats $130+ for just the letters in only 2-3 different fonts. :) Plus all the time Nick put into cutting them out for me. He vowed never to do it again. The look on his face was priceless when Cait announced she wanted one too. Hahaha.
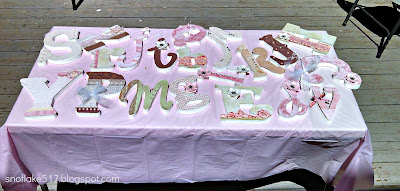
At the party, I put letters in baskets and laid the supplies out on a table, along with a sample I had made.
Then we went to town and decorated. I bought a scrapbook paper pack (so all the paper coordinated), glitter, stickers, rhinestones, pearls, mod podge, sharpies, ribbon, and twine.
We traced the letter onto the back of the paper and cut it out. Use a thin layer of mod-podge onto the letter to glue the paper onto letter. Perhaps, decorate the paper a bit more. Then another thin layer (or two) to seal the paper. Let dry, add a bit of ribbon or something to decorate further and then all done.
I had leftover flowers from the mobile I made (more on that coming) and so I tossed them in the decorating goodies. Now it all matches. Yay!
Everyone that made one signed the back and so now Fallon has a personalized gift from everyone that was there and something fun to hang on the nursery wall! :)


Wow this is great! I would LOVE to do this.
ReplyDelete