Tuesday, December 31, 2013

Resolutions Recap Part 2

Yesterday I began recapping my bucket list for this year. Let's see how I did with the rest of the list:

17. Learn a new skill
           I learned to sew! And I learned several different types of skills within the realm of sewing (basting stitch, french seam, ruffling, etc.). It's been fun and pretty easy. And I can't believe that I've struggled with it my whole life. Maybe on my 2014 list, I should make some clothes...because that really makes me nervous. I did get some cute patterns that I want to try...
18. Make my stocking
            This didn't happen. Bummer. I started it, but then I stopped because I was busy with so much other stuff this year. Oh well. Maybe next year!
19. Make stocking for my new niece/nephew!
          THOMAS! YAY! He got a stocking!! This came down to the wire, but I did it. And now he has stocking to go with the rest of his family! Yay!
20. Fix my sewing machine
           The original problem was solved by Caitlin (we won't talk about how simple it was to fix...) but now the timing is off so I really need to have it serviced. Maybe this next year? Hopefully?!
21. Get new bed linens
          Working on it still. Why do the nice ones have to be sooo expensive?! Sheesh.
22. Sew a duvet cover
           Heck yes I did this!! As you well know. Bam baby.

Isn't it beautiful?! It took me months, but it was so worth it.
23. Take an online craft class
           Well, it wasn't a "craft" class necessarily, but it was a "organizing your craft stuff" 27-week class--which was necessary for me so I could get a handle on my goodies. I did it and now everything is beautiful and organize! Yay me! (See the white boxes in the above picture...yep. That was the result. :) )
24. Take myself on a date once a month
           This didn't happen as much as I would have liked. But I did make time to do stuff I enjoy...even if it was just 20 minutes window shopping at a craft or thrift store.
25. Visit a local museum
           Bummed this didn't happen. I should try to do this next year.
26. Organize my books
            Nope. I wish....I still need two more bookcases...
27. Catalog my books
          
Didn't get to this either. Time. I need more time!

28. Write more
           I did! But I didn't finish anything. But I did write...so that is a start.
29. Work on my Grandpa's Autobiography
          Yay! Another thing I did...well not really. I pretty much handed this over to Caitlin. My schedule has been so tight this year, and she had access to tools I didn't, and more free time, so she pretty much did it all...but it's so close to being done! Next year is the year it will be done.
30. Upholster my bedroom chair
          I decided that I didn't want to upholster the chair. I like the solid wood, but I did make a cushion so its more comfy...so that counts, right?
31. Build an ottoman
          My new roommates have plenty of furniture so I ended up not needing to make one...but when I do have my own place, or they move, I will make one. Just not this year.
32. Buy a power tool and use it on a project
          Does a staple gun count? Because if it does, then I did! Yay! But if not, maybe next year.
33. Take an art class
          I was so busy with my program's classes, that I didn't have a chance to take one. Maybe next summer?
34. Teach a class
          Well, at church I got called to be the Family History Class Teacher, so since this is my list, I'm going to count that. :)
35. Take 5 family names to the Temple
          Heck yes, I did this! Over 50 names! Bam! I was really lucky, blessed to get in touch with a 4th cousin from Australia that I don't know that had a whole family with 9 kids and several generations that my family didn't have. Glory! And I got the names ready and took them to the temple. My ward did the baptisms/confirmations and then I farmed the rest of the ordinances to that side of the family to help. It was an incredible experience. :)

So that my friends, is how I did on my goals. Considering my hectic schedule, I think I did pretty darn good. :)

And I really liked doing the whole bucket list thing and then recapping it. I think I'll do it again.

Let's see what 2014 brings!

Monday, December 30, 2013

Resolutions Recap Part 1

At the beginning of this year, I created a Bucket List of things I wanted to do this year. So at the end of 2013, I want to recap what I did (or didn't do) to fulfil each of these.

1. Read 50 books.
        I did it! I even upped my goal to 60 because I was doing so well! I ended this year with 65 books.  
2. At least half of the books I read need to be new ones I have not yet read.
        Totally got this. :) Probably 75% of them were new. Yay!
3. Read at least 2 non-fiction books.
        Well, I did read lots of non-fiction paralegal books, does that count? No? Well then yeah, this didn't happen.
4. Travel somewhere new
        Unfortunately not. I did get to go to Chicago a couple of weeks go, fairly unexpectedly and was a total blast, but I didn't get to go to Washington D.C. / New York City like I wanted to. Bummer. Hopefully in the fall I can?
5. Go to three new states (Currently I've been to 21!)
         This goal was in connection with my D.C. trip--so hopefully in 2014.
6. Go to the temple every month
          Yes I did! I'm pretty sure I averaged 3 times a month, maybe 3.5. I really was trying to go every week, but sometimes that just didn't happen. I'm pretty sure that because this was a priority and I built my schedule around it, it was the only reason I survived school this year!


7. Finish Cait's Wedding Scrapbook
          I worked on it! Which is better than last year. So there's something...
8. Finish my Chicago Scrapbook
          It's over half-done so I did work on it quite a lot, just not in the second half of the year. So....yeah. Moving bedrooms and trying to get that set up so I can scrapbook took me a lot longer than I thought it would. That happens when you have grand-ish plans and little funds. Hopefully with school winding down next year, I'll have more time to spend on things like this.
9. Go back to school for Paralegal Certificate
          I did! Eep! And I did better than I thought I would. As I've discussed before, I even survived going to school and working full-time this past semester. And I found out that because I already have a Bachelor's, I automatically qualify for the Associates in Paralegal Studies. So that is exciting. By May I'll have another Associates degree. Yay.
10. Spend time with my family each week
          This one was really important to me and thankfully Cait gets bored so she lets me come visit her and hang out at her house. And she feeds me and helps me with my projects--which we don't usually work on, but still. It's pretty awesome.
11. Teach Rachel to say my name
          She totally can! Though usually it sounds more like "bacon" than "Megan." Not sure if that is a good thing or not yet. :) But she is adorable and gets so excited when I open the door. Good news is that Rachel knows all her body parts. That is a hilarious game to play. She even throws in some body parts that Cait didn't teach her. hahaha. And if you ask her what the fox says, she busts into song and start dancing. Its totally hilarious. Her favorites are that one, wheels on the bus and ring around the rosie, but usually she forgets the "sh" sound in the "ashes ashes" part. hehehe.
12. Create some kind of art wall hanging
          I had plans for one, but I ran out of time. Boo.
13. Apply for another design team
           I seriously considered applying to two different teams (of companies that I really love), but after reviewing their requirements if you made the team, I realized that I just wouldn't have the time to put into it. It was super sad. Hopefully this next year I can do one.
14. Get two new tires
           Yes and I got a incredible deal! The guys were so nice and found me gently used tires to replace the scary ones on my car for only $50 for two! Awesome!
15. Replace the brakes on my car.
           Thankfully I have an awesome brother-in-law that lives conveniently close-by that was kind enough, somewhat willingly to do this for me. :)
16. Go to at least two new temples.
           Salt Lake (beautiful and so ornate!!) and Chicago. Both awesome experiences with incredible friends.


Items 17-35 up tomorrow

Thursday, December 26, 2013

Rachel's 2013 ABC's Book

I had Caitlin and her family for Christmas (we're poor so we do name exchanges). Yay! That means presents for the bay-bays!
Funds were a bit scarce this year (ya know, with the unexpected surprise trip to Chicago! Ahh! So fun! :) ) and so I had to get a bit creative with what to give my sister and her family. Rachel probably won't remember this Christmas, so I knew it didn't have to be very fancy and I know that Caitlin is working with Rachel to help her learn (the kid already knows her body parts--including ones that no one taught her!) and since Rachel is turning 2, I thought I would make her a little ABC book to re-count her 2nd year of life. Almost like a scrapbook mini-album.

I found the perfect sized board book at a thrift store for $1.49--along with two others of same type, which I also got her. The books are "I Spy" books (which I love!) and I just took the one that I liked the least and recovered the pictures. There were exactly enough pages to do an ABC book.

So using a photoediting program, I edited pictures of Rachel and her family and put words on them for each letter. Then I measured the book so I knew what size to print the pictures, sized the pictures, printed, and then adhered them to the book using my trusty ATG tape gun. And because Rachel is 2 and has a drooly little brother (he's teething), I covered the pages with clear contact paper. And it was finished.

Here are the pictures I used.

(Note: when I put the collages together, the edges got cut off. They aren't in the actual book. And yes...I did stretch a couple of the letters. There are not that many words--as in none--in a 2-year old's world that start with X, okay?)


And here is a picture of the final book.


I thought it turned out really cute. Very easy, and pretty quick. Deciding on pictures and words to go with the letters was definitely the hardest part.

Merry Christmas to Rachel!

Monday, December 23, 2013

Surprise Trip to Chicago aka The Time I Turned into a Creepy Stalker

So in the crazy rush of finals, I forgot to talk about my latest adventure!

I went on a quick weekend trip to Chicago earlier this month!

This all started one Sunday morning in mid-October when I had this really weird dream about some of my roommates in college randomly showing up in San Francisco, without telling me and I ran into them there. And there was something about a bus driving on the sand and not getting stuck until someone asked how we were able to drive on the sand. Anyway, I digress...

So one of the roommates was Lisa (and Nicole--who I had seen in August when we went to Utah and I got to go to the Salt Lake City temple with her and do a session...so super cool...and again I digress...)--one of my roommates both our junior and senior years. It was epic. Anyway Lisa and her family live just outside of Chicago and about a year and half ago, I went and spent just over a week with them. It was super fun!

I've missed them since then. So when I had this dream, I woke up with the certain knowledge that I need to go visit them asap.

Then a plan, a deviously awesome, secret plan began to unfold in my mind. Lisa was going to turn 30 on December 2nd. What if I surprised her for her 30th birthday?! [Insert maniacal laughter here.] I immediately texted Adam, her husband, and asked what he thought. He got so excited. So after several days of checking ticket prices and stressing and getting disappointed when I thought it wasn't going to happen, I found the ticket.

A direct flight from San Francisco into Chicago-O'Hare. YES! Interestingly when I looked up this flight, it was cheaper to have a layover in Chicago and then continue on to Milwaukee. Well that's silly, so I just decided to skip the Milwaukee portion. Which ended up being a really good thing because the return flight from Milwaukee to Chicago ended up being cancelled on Sunday. So glad I didn't have to deal with that.

So the ticket for the weekend after Lisa's birthday (which was also the weekend of her party) was only $226! That's almost half what my ticket last time was. Yippee! So I quickly texted Adam to make sure the dates and times worked (someone needed to pick me up!) and then nothing. I didn't hear back! After a frantic hour of waiting for a response, I said a prayer that it would work out and bought the ticket.

Turns out Adam was tied up in a meeting, but called when we were both off work and said the times were perfect.

Can I just say how hard it was not to spill the beans?! I thought it would be easy since Lisa and I don't chat all the time, but suddenly she was messaging me on facebook and commenting on things and emailing me, etc. It was like she subconsciously knew or something. There was one particular day it was really hard because Adam and I were texting making plans, and then Lisa started emailing me the same day and I was having conversations with both of them. It almost drove me crazy. It was quite hilarious.

So that Wednesday after work, and school, I made a somewhat mad-dash to San Francisco (super confusing to find the long-term parking!) to make my red-eye out flight, landing in Chicago about 6:00am. Perfect. Adam picked me up and then we headed back to their house to wake Lisa up and surprise her.

It was totally awesome.

6:30 in the morning, we both walked into their bedroom and Adam woke her up. Here's the conversation:

Adam: Lisa, honey, wake up. I have a surprise for you.
Lisa: Nothing. She sleeps like the dead. And is totally not a morning person. Mwahaha.
Adam: Lisa, wake up there someone here to see you.
Lisa: Wha?! Who? [she was so confused]
Me: Nothing. I was just standing in the doorway.
Adam: Its someone special all the way from California.
Lisa: a couple of seconds go by of her looking at Adam confused.
Me: Hi Lisa.
Lisa: She whips her head around. "Megan?" and attempts to fly out of bed and gets tangled in the blankets. It was hilarious. She was so confused and mostly still asleep.

We hugged and she just stared at me.

Lisa: You're here. In my bedroom.
Me: Yep. Surprise! Happy Birthday!

Another hug.

Lisa: You're really here!
Me: Yes I am.

Another hug

Lisa: When did you get here?
Me: About half an hour ago.
Lisa: I can't believe it! You're here in my house. Oh! You haven't seen our new house. I need to give you a tour. This is our bedroom.
Me: It's nice and big.
Adam: Happy Birthday, Lisa. I'm going back to bed so you guys go downstairs to talk, okay?

We laughed and went downstairs. And talked as fast as we could for about an hour and half catching up on everything under the sun and then both fell asleep till Lisa's two kids woke up. It was pretty fantastic.

The rest of the weekend was spent with Lisa and her family and their friends. Lisa's party was really fun. Adam themed it as a "Death to Lisa's 20's" and everyone wore black and gave eulogies. I then realized that Lisa and I have known each other since we were 19 so I had known her all of her 20's! 10 years we've been friends. It's crazy!

Thursday and Friday nights we had "game" nights with their friends, the Sessions and Atchinsons. Love those people. They are super fun and so nice. Thursday night, during the conversation about how Lisa and I knew each other, we realized that we knew way too much about each other. And at one point I realized that I was pretty much a stalker because I knew so much about her AND showed up in her bedroom in the "middle" of the night. Yeah....creepy. And freakin' hilarious! :)

The weekend was totally casual and we never made into the city. We planned to, but Saturday kind of got away from us and so we didn't make it. But it was okay. Lisa and I went to breakfast at this little restaurant we went to before (Wildberry--soooo good!) and then went to the Chicago Temple. We didn't have time for a whole session so we just did some other stuff. It was really fun to hang out with her there and have a really great discussion--and I got to see another temple. We both needed that. Later the three of us went to a really awesome hole-in-the-wall Chinese place. Their group of friends have a babysitter swap each week (genius!) so the kids were left with some of their friends.

The days were long and involved lots of playing with the kids, reading, relaxing, eating, and talking. There was little sleep and it was awesome--exactly what I had anticipated. I hardly even took pictures because it just felt so normal. It was perfect. Lisa and Adam even tried to convince me to move in with them--"rent free." Ahhh. I wish. :)

It snowed all day Sunday (yes!!) which led to my flight being delayed 3 hours (2 of which were spent on the plane on the tarmac--but I honestly didn't even realize it was that long. It didn't feel that long.). This meant that I few in that Sunday night and landed at 12:30am (technically Monday morning) and then had the two hour drive home. Fortunately I had texted my boss before my flight took off that I was going to be in late due to the delay, so I was able to get some sleep.

So it was a perfect trip (except the part when Adam got really, really sick--but he survived...) and Lisa was beyond surprised and excited. It was totally worth it.

Sunday, December 8, 2013

Bedroom Makeover: The Duvet

Alrighty folks, this is the big one.

After much debate, fears, tears, and mental swearing, I have a new duvet! YAY!!!!

Why can't I just dream small for once? Oh, no! It's impossible. Once I get a mental picture of what I want, I have to go for it. And it always is way more complicated that it really needs to be. I think it's a disease. (Exhibit A: New Christmas Stockings)

But go big, or go home, right? RIGHT?! Please someone agree with me...

So I went big. Lit-trally. (hehehe)

My duvet is King size. Yup. I have a Queen size bed. But I really wanted the blanket to go down the sides of my bed. Especially with all the ruffles. It looks so pretty on the sides. :)

Originally I was going to do a pretty, light turquoise/Tiffany blue color for the duvet with white sheets. But that turned out very difficult to do unless I wanted to pay major bucks. Turns out that its really, really hard to find 6, yes SIX, king size flat sheets in that right blue color. Even online. boo. I did find some at one store, but it was $40--just for ONE flat sheet. Yikes!

I considered getting white sheets and then dyeing them the color I wanted. But then I got really worried I wouldn't like color and would have wasted everything and that the project was going to fall apart. [taking deep breaths]

So, hello compromise. (You'll be so proud Mom--I am flexible in my grand plans!) I decided to make a white ruffle duvet and use pretty blue sheets. I found soft, nice sheets at Target. Turns out white is MUCH easier to find. Imagine that.

Several paychecks later, I had enough sheets. :)

And then came the sweat, fears, tears, and mental swearing.

I used this fabulous tutorial to help guide in my adventure. I started measuring, cutting, sewing, ruffling, pinning and sewing.

Thankfully Caitlin volunteered to help and was willing to iron. I think she just wanted to make Nick watch the kids all day. :)  WHY IS THERE ALWAYS SOO MUCH IRONING IN SEWING?!

Ahem.

Caitlin had been convinced that we could bust out a fully ruffled KING size duvet in one day. Ha! Even I knew that would have been impossible. It took hours and hours and hours and many episodes of Ugly Betty to get only part of the strips ironed.


But I slowly worked on it. Then I got really worried...what if I actually finished it....and then I hated it. All that work for nothing!  Caitlin's nonchalant words of comfort: "Well, you could probably sell it if you don't like it." Oh, okay. Gee. Thanks.

Good thing that didn't happen. I do love it. Like really love it.

So...let's take a moment to talk about how much fabric was involved here. Remember SIX King-sized sheets? So the base the ruffles are sewed to and the actual bottom of the cover are 92" wide and 104" long--which is slightly cut down from the sheet size.

For each ruffle strip, I cut 4 sheets up into 52--7" strips which were 104" each. Then I took two strips and sewed them together to make one horrendously long finished strip (208" long)--of which there are 27 on the duvet. Yeah, doing the math, my duvet has 156 YARDS of ruffles. That's a lot of ruffles. 

Each side has a 1/4" double turned hem, leaving the finished strip 6" wide. Then one of the long sides was ruffled. I tried to use the finished edges as much as possible to save me some sewing.


Each ruffle was sewed 10 cm apart so there would be about a 2" overlap of each ruffle, making the ruffles fuller. I took the time to draw lines every 10 cm on the base sheet. This saved a lot of time and frustration later when I had to pin and sew the ruffles on.


Doesn't the ruffle foot look terrifying? It sounds scary too! I kept thinking that something was going to break because of all the loud metal clicking, but nothing did. The foot worked like a charm. Best investment. And I love that I found it on Amazon for $10 with free shipping! Sure beats the $45-60 I saw everywhere else!

Sewing the ruffles on was hard and I very quickly discovered it was much faster and easier to sew with the ruffle than against it.


I actually had fun sewing--in between all the broken needles, broken threads, and bobbins that wouldn't wind. I should have bought a sewing machine years ago. Apparently that was all that was necessary for me to get over my inability to sew. :)

Here's a peek at the back of the top. I loved the way the zig zag strips look on the back.


After a couple of months, I finally finished. It is sooo hard to find time to cut, iron, sew and sew and sew between working full time and going to school full time. The only reason it got done so quickly was because it's getting cold and I need a blanket. hahaha. We won't talk about what should have but didn't get done while I sewing. :)


The comforter had corner loops to tie to a duvet, so I sewed in some ties, which were just 1/4"   white bias tape, cut in 8" strips, folded in half. I also sewed some 4 additional loops and ties along the top to help keep the comforter in place. 

I have yet to sew in a closure at the bottom. I think I'm going to eventually put in velcro.

So here it is, all done!


I really do love how it turned out and the thin comforter I put in it is the perfect thickness. The duvet is freakishly heavy when carrying it around, but when it's on my bed it feels quite thin. It's perfect.

Future plans: Eventually I will have blue sheets and a blue bed skirt under the duvet. And I have plans for a cool tufted headboard. Thank you internet for all the inspiration!

Friday, December 6, 2013

Bedroom Makeover: A New Lamp

I decided a while back that my little 10" lamp on my nightstand just isn't cutting it anymore. I like to read in bed and need a taller lamp. So I've been looking. And I've found lamps that I like, but I wanted something tall, glass, and different looking. That's hard to find in price I could afford. Then I on pinterest (shock!) I saw a DIY lamp tutorial.

WHAT?! YOU CAN MAKE YOUR OWN LAMP?!

The tutorial made it seem so easy. (And it was.) I could totally do that. (And I did.)

So I went to a couple of thrift stores and then ended up finding just about everything at DI. Yay! I did have to go to Lowes to get a harp (the loopy thing that holds the shade--not a musical instrument) and a cap to hold the shade in place.

Here's what I started with:


Glass candle holder with a cool crackle effect on the bottom: $3
Old Lamp base to be cannibalized: $3 (major plus that I realized when I got home--it's actually a three way lamp--something that I forgot to check for at the store.)
Lamp Shade: $1
Harp: $4.25
Knob for the top: Clearanced to $0.80. Normally $3.98.

Lamp cost: $13. Yay!!

Close up of the glass. I wish the awesome crackle look went all the way to the top, but I can't complain too much since it's the shape and height I was looking for. And it was $3.


Because the original lamp's wiring came out through the bottom of the bulb holder thingy (techincal term), and I couldn't and didn't want to have my wiring come out the bottom of the glass, I had to "drill" a hole in the side of the plastic covering for the switch & bulb.

I don't have a drill. This lead to a clever and probably dangerous solution. I took a screwdriver and heated it up with an open flame and sort of melted and screwed a hole into the plastic. I wouldn't recommend this way. My hands cramped up and it took a long time to get it done. But it worked and the wiring went through.


 As far as wiring the actual lamp. I made it a little harder than it needed to be because I didn't label which wire went to which tab. I didn't realize till later that it matters. Turns out it does in a big way. So after watching multiple videos on youtube, I figured it out. I'd recommend doing research and watching videos before you get started.

Next, was to figure out how to mount the bulb/switch to the candle holder. I tried several variations, including the picture below--which was too wobbly.


After some trial and error, I ended up using the metal discs that were decoration in the old lamp as the base for the new one. They were almost exactly the diameter of the top of the candle holder. YES! Using the washers and screw/rod thingy, I tightened everything together and hot glued the metal disc to the candle holder. So far it's holding up. And the nice thing about hot glue is that with a bit of effort, I can take off the lamp fixture to put some pretty filler in the candle holder.

If the hot glue ends up not holding, I can always use e6000 glue.

I added the harp, shade and top knob and voila! I have a lamp!

I wanted to do something fun with the lamp shade. I like the color and, considering it's a thrift store find, it's actually in excellent condition. But it was needing something else.


I thought about drawing/painting french script document images. Those look so cool--but it doesn't exactly go with the coastal, peaceful vibe I'm going for. And then I thought that I should do something that means something to me. I saw an image of a custom lampshade that had song lyrics, and that inspired me to draw sheet music for one of my favorite hymns on it, but when I started tracing it with pencil, I didn't love it.

I saw a picture of a ruffled lamp shade that was cute, but I was worried that it would be too much because my bedspread is a lot of ruffles. But I couldn't think of anything else and then when looking at my fabric, I realized that the muslin I bought was the same color as the lamp shade, so I went for it. And this would be good practice for ruffling since I made this before the duvet.

I took measurements of the top and bottom of the lamp shade and then doubled it because of the ruffle. I cut several 5" strips of muslin and then sewed the stips together as need be. The top needed two 20" strips and the bottom needed three 20" strips, plus a little extra. Then I began ironing and sewing. I sewed the stips so they were folded like bias tape (a folded hem and then folded in half). I sewed the stips along the hems and then along the center fold so both sides were sewed.


Then I ran a basting stich (Mom! I know what a basting stitch is! ha!) down the middle of the strips. I began gathering. It was rather frustrating because I kept breaking the threads and having to sew new ones and tie them off and so on. But eventually I ended up with a decent looking ruffle.

All I did to attach them was hot glue them to the edges of the lamp shade.

I really like it. It turned out much better than I thought it would! And the last picture is a sneak peak at my nightstand makeover. :)


Perfect.

I've been using the lamp for several months and I LOVE it.


Next up: Ruffles!!

Thursday, December 5, 2013

Bedroom Makeover: The Nightstand

I decided to experiment on my nightstand and repaint it. I liked the dark brown/black look, but it didn't really go with my new room decor. So a makeover it is!


My experiment was successful and I love it. Which is nice, because I was coming off a fail (the tall bookcases) and a little frustrated. 

I don't have a sander anymore (boo hoo!) so I was going to borrow my brother-in-law's to sand down the stain (paint?) on the nightstand. Then I remembered about Chalk Paint. I've never used it before. It sounds intriguing and totally awesome.

(This is the experimenting part.)

I've been curious if it really would be as awesome as I've heard. And I've seen tutorials on pinterest advertising "Make Your Own Chalk Paint!" Well considering that a tiny jar at a craft store is almost $20, I was all about making my own.

And I did. And it was fantastic!

I did a lot of research online for recipes and reviews. Since I already had baking soda (vs. plaster of paris or unsanded grout), I settled to try that one.

I picked up my two colors of paint (Vintage by Valspar and Gem Turquoise by Behr). I'm a fan of the Behr Premium Plus (primer & paint in one!) so I picked up the sample size at Home Depot and they matched the two colors.

I wasn't too sure what I was doing as far as making the actual "Chalk Paint" so I wanted to make a small batch first of the cream paint. Its a good thing I did because didn't need as much paint as I thought I would.

So I mixed up a 1/2 cup of paint and 4 tablespoons of Baking Soda (mixed one tablespoon at a time). Some recipes suggested adding water, but I liked the thickness of the paint since I was covering up a dark color with a light color. I only had 1" sponge brushes handy so I used that, although a smaller brush would have been nicer for the small spots.

Then I started painting with no prep of the nightstand (other than cleaning it). I did two coats. I was a little surprised at how obvious the paint strokes were (maybe I shouldn't have been?) but after two coats it wasn't quite as obvious. The paint covered well and was nice and thick. It dried quickly too, which was really nice. I was able to get the nightstand completed in just a few hours!

After it dried, it was gritty (as expected) and so I did a light sanding and it smoothed out beautifully. I pressed a little hard on the edges and accidentally distressed it, but I liked the dark color peaking through so I rolled with it and did a light distressing along the edges.

I had made my own stencil with my cameo for the backs of my bookcases (hello frustrating project fail!) and so I decided to use it on the nightstand--just so it wouldn't go to waste. 

I made a little chalk paint for the blue (1/4 cup paint and 2 tablespoons of baking soda). That was way too much paint, but oh well. I then began painting with the stencil. I was too excited and forgot pictures of this part. :) The stencil worked pretty well. There was some leakage underneath, but I just painted the cream over the top to cover it up.

Once the paint was dry, I distressed the top to give it some character. For the finish, I waxed it with some paste wax I had left over from a different project.  I let it sit overnight in my garage to help the smell from the wax dissipate before I put it in my room. I finished it off with a fun knob I've had for a couple of years in the drawer and declared the work done.


I love it in my room. I love the pretty blue and it looks awesome with my glass lamp I made--coming soon!

I was actually pretty nervous since I've never made or used chalk paint before. And since I had a rough time with the stencil before, I was worried it wouldn't look very good here. Glad I was brave and did it anyway.

Best part? The whole thing only cost me $6.00 for the paint. And I have lots of paint left over. (hmmm...what to do with it?!) I think Chalk Paint (baking soda paint?) might be my new best friend!

Winning!

Wednesday, December 4, 2013

Bedroom Makeover: Bookcase Fail--with a Happy Ending

I had a frustrating failure in my journey to make over my bedroom. I had grand plans for the bookcases in my room. I wanted to incorporate the pretty beachy blue/turquoise color I had decided on and stencil the backs for a fun pop of color.

Problem: Two of the bookcases are already built.

Problem: I'm really lazy and didn't want to take them apart.

Problem: What if I did take them apart, paint them, put them together, and then hated them...or decided in the future to change them?

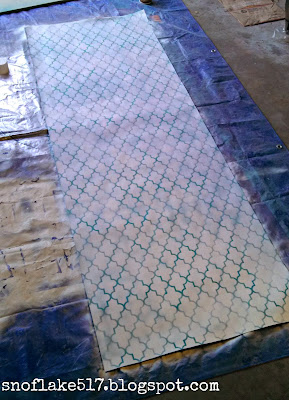
So I came upon what I thought was a good idea. I had yards of white butcher paper I had bought for a different project, but ended up not using.

What if I made my own fake wallpaper?

Brilliant, right? Cut the paper to right size and then paint and attach. Bam. Done. Easy.

Yeah, no.

I cut the butch paper in the right size (I actually cut it a little big so that I had room to work with and didn't end up with something too small).

I cut the stencil out--which took FOR-EV-VER! Five pieces of 12x12" chipboard that had to be cut 4 times each to go all the way through. But it worked, was glued together, and looked lovely. Exactly what I wanted.


I thought I wanted the lines of the design to be blue so I realized that in order to do that, I needed to have blue paper. That meant spray painting the paper blue. Okay. No prob. Several hours and two blue feet later, I had pretty blue paper. So far so good.


Then I laid the stencil down and began spray painting the paper white again. (Ridiculous right?!) I began moving the stencil down the first strip of paper and I noticed that the spray paint was leaking underneath the stencil. Well, duh! The stencil wasn't laying perfectly flush and there were gaps. Should have thought that through better. I had been afraid to use a spray adhesive since all I have is permanent adhesive.

I finished the one strip, holding out hope that it would look okay when all was said and done.

Yeah, no. I didn't like it. Too much white. And totally uneven.


So on to strip two. Well now I wanted white strips and the paper was blue. Ugh. Not wanting to waste the $2 paper, I had the brilliant idea to draw the pattern on the paper and paint it in with white paint. By the way, the book cases are over six feet tall.


So I drew the lines in from the stencil. That took much longer than $2 paper is worth, by the way. Then I began painting. Fortunately (?) it didn't take long for me to realize that I didn't like this either.

This was not working out well.

All I wanted was a fun background for my bookcases! Waaaaaaahhhhh!

So I started over again. This time with plain white paper, cut to size and then painstakingly painted in the stencil blue (like a normal person--instead of trying to find an easy way).

This didn't work either. Fail.

Fast foward several months because I was really frustrated...and poor.

I found fabric that was exactly what I was looking for, on sale and with a coupon, to use as the background. Much, much easier--and it looks better too! I LOVE it!


All I did was cut the fabric slightly larger than the background and fold the edges over and use a staple gun to attach it to the back board. Easy, peasy...but for real this time.

Eventually there will be another bookcase to the left of this one, and then around the corner to the right, facing the bed. The rose painting will be moved to be above the short bookcase, next to my TV.

Yay! So all is well that ends well. Right?

Tuesday, December 3, 2013

Bedroom Makeover: Master Bathroom

One of the perks to having the master bedroom is having my own bathroom! Yay!

I didn't really do too much, especially since the walls were already painted a awesome blue color and the white shelves were already in place.

I had some white netted curtains (ikea) that I thought I was going to use to over the sliding glass door, but ended up not using. And since I had an extra shower curtain rod, I decided to hang those up over the shower doors. The curtains were really long so I put the rod right at the ceiling. I love the way it looks!


I also wanted some glass jars to hold my cotton balls and q-tips, but I was running low on funds so I found some candle jars that were left behind when my roommates moved out and emptied out the wax. They smelled nasty.


Once they were clean, I used them, but thought they were kind of boring. I wanted to bring some color to the counter so I looked up ways to paint glass. In my hunt, I came across a Martha Stewart paint that is for glass, but is frosted so it looks like sea glass. Perfect!

I picked some up and, after reading directions online, began painting. I really like how they turned out. The only thing I would change was that I put on two layers because I wasn't sure what it would look like when they were done baking. I should have just done one layer. But not a big deal.


Then I found a scrap of cream ribbon that was exactly the right length to split between the two jars, cut a cardboard circle, covered it in teal glitter, and hot glued some starfish I had laying around from a different project.


My bamboo plant was in the kitchen, but was in the way so I moved it to the bathroom. I love it in there. The mirror makes the plant feel a lot bigger than it really is, and it's pretty big.


I really love how my bathroom turned out.

Monday, December 2, 2013

Bedroom Makeover: The Trunk

I've had this awesome trunk since my freshman year of college. My mom bought it for me as a "Yay! Megan's-moving-out-of-my-house-gift." Okay. Everything I had when I moved away to college was pretty much that type of gift. It was pretty obvious she was a little excited for me to move out and go out of state to college.

Anyway. So I've had this trunk for, um, a long time. And unfortunately it's had to live in my garage for the last couple of years. I love it. I thought it would be perfect to sit at the end of my bed, put a little cushion on it and instant seat! Unfortunately, the colors don't match my room.

I considered painting it cream and then painting the hardware silver. Yay for spray paint!

But then I realized how many cans of cream paint it would take to cover up the black faux leather (vinyl?).

So I decided to make a little slip cover so the trunk is still accessible and I can continue to use it as extra storage.

Let's recall that my sewing skills are very, uh, non-existent. So this little project was going to be a stretch. A simple box shaped slipcover and a cushion. Well, bring it on!

I picked up some beautiful turquoise damask pattern fabric for the cushion and a solid dark turquoise ($3 for 3.75 yards!) as the slipcover.


I don't really know what I'm doing so I won't make a tutorial.

For the slipcover, I measured the trunk, added an inch for a 1/2 inch on each side and then somehow the measurements actually worked out--with a finished seam at the bottom.

It fits perfectly! I really not sure how that happened, but I'll take it. :) Just don't look to close to the corners. I had a bit of a tough time figuring out how to sew them. But it worked out. And the seam matches up on all the sides. It's a miracle! :)


For the cushion, I picked up some foam from Home Depot (MUCH cheaper than a craft store) and then some batting to wrap the foam. I ultimately decided to make the cushion double sided instead of using a wood base. I wasn't sure how to make the batting stay in place without lots of hand sewing and so I grabbed some muslin and created a cover. (A feat unto it's self...it's hard to sew tightly against 3" foam).


Then I started sewing the slipcover, complete with cream piping. And surprisingly it worked! I'm not sure why me sewing is working, it never has in the past, but hey, I'll take it. haha. I hand sewed in snaps to close the side. 


I really love this damask fabric and was excited to be able to use it in my room. :)

Coming soon...bookcases, an epic fail, and bedding!